Find a plumber near you

We're Available 24/7! (360) 610-7901

Author: Bo

Inside The Grind: How Does a Garbage Disposal Work?

In today’s fast-paced world, the conveniences of modern living are often taken for granted. One such marvel of home innovation, entirely hidden under our kitchen sinks, is the garbage disposal. 

At Full Speed Plumbing, we’re not just about fixing leaks and unclogging pipes; we’re also here to shed light on the everyday appliances that make your life easier. 

In today’s blog post, we’ll take a deep dive into the inner workings of this indispensable kitchen helper. Understanding how your garbage disposal manages waste can help you use it more efficiently, avoid common problems, and ensure safety. 

Join us as we explore this remarkable appliance’s service to our homes and the environment.

Types of Garbage Disposals

Garbage disposals are generally available in two types: continuous feed and batch feed. Both serve the crucial role of managing kitchen waste but cater to different user needs and safety preferences.

Continuous feed garbage disposals are among the most common and user-friendly types. With this model, you can keep adding waste as the unit runs, making it convenient for busy cooking sessions. 

The pros include ease of use and the ability to handle a constant stream of kitchen waste efficiently. However, convenience comes with caution; the open drain requires mindfulness to prevent accidental dropping of non-food items or personal injury.

Pros:

  • High efficiency and convenience in waste disposal
  • Ideal for busy households with continuous kitchen activity

Cons:

  • Requires careful use to avoid accidents or damage

Batch Feed Garbage Disposals, on the other hand, require you to load the disposal with waste and close the lid to operate. This design is built with safety as a priority, making it an excellent choice if you’re a customer with young children. 

The batch feed model’s pros include enhanced safety features and preventing foreign objects from accidentally falling in. The cons include a slower cleanup process since you must wait for one batch to finish before starting another.

Pros:

  • Increased safety by preventing accidental operation
  • Suitable for households that prioritize safety over convenience

Cons:

  • Less efficient for disposing of large amounts of waste quickly
  • Might be less convenient for those who multitask in the kitchen

In choosing between these models, consider your household’s specific needs, safety concerns, and the volume of kitchen waste typically generated. Each type offers distinct advantages for convenience, efficiency, or safety in your kitchen waste management solution.

Grinding Mechanism and Blades

The heart of a garbage disposal’s functionality lies in its grinding mechanism and blades. These components work tirelessly to break down kitchen debris into fine particles, allowing for safe passage through plumbing systems. Imagine the grinding mechanism as a professional, diligently at work, ensuring that even the toughest pieces of food waste are managed with precision.

The process begins when food waste is introduced into the disposal chamber. Here, high-speed rotating blades come into play, acting like skilled chefs chopping ingredients. However, instead of preparing a meal, these blades are focused on minimizing waste size. 

Their sharp edges effectively slice through food, reducing it to smaller fragments. This is crucial in preventing clogs and ensuring a smooth cleaning process post-meal preparation.

It’s worth noting that while these blades are adept at handling most organic materials, they are not invincible. Non-food items, particularly tough food debris, pose a significant risk to the mechanism, potentially leading to damage or needing professional repair. 

So, it’s essential to be mindful of what you dispose of, reinforcing the importance of user responsibility in maintaining the product’s longevity and efficiency.

Installation and Location

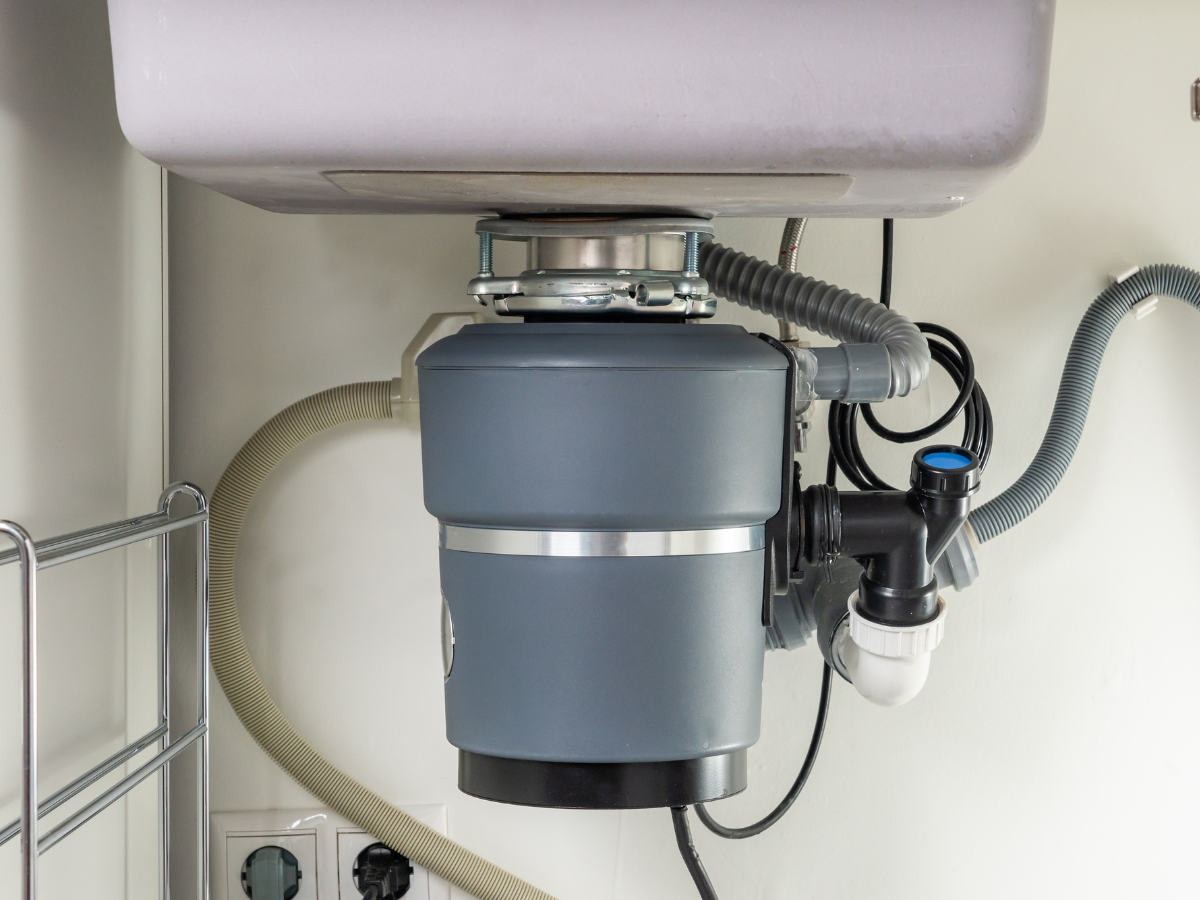
Several key considerations ensure optimal functionality and convenience when it comes to the installation and location of garbage disposals in your kitchen. Typically, garbage disposals are installed under the kitchen sink. 

This strategic location allows for the direct disposal of food waste from plates, pots, and pans into the sink and then into the disposal unit. The proximity to the sink’s plumbing also facilitates efficient waste disposal, directly integrating with your home’s drainage system.

When integrating a garbage disposal unit into your kitchen’s plumbing system, it is paramount to contact a professional plumber to perform the installation. Doing this ensures the unit is correctly connected to the electrical and plumbing infrastructure, mitigating the risk of leaks, clogs, or electrical issues. 

Professional plumbing companies will also ensure that the disposal is compatible with your sink and drainage system, providing peace of mind and preventing future complications. Furthermore, correct installation influences the disposal’s longevity and efficiency in managing kitchen waste, underscoring the importance of involving experienced technicians from the get-go.

Adhering to the principles of safe and proper installation guarantees the smooth operation of your garbage disposal and secures the safety of your household. Given the appliance’s role in daily kitchen activities, ensuring its correct placement and installation by professionals is a smart investment toward maintaining a functional and efficient kitchen.

Conclusion

Understanding the nuances of garbage disposals, from their types to the intricacies of their installation and the critical role of their grinding mechanisms, empowers homeowners to make informed decisions for their kitchens. 

Whether you prioritize safety with a batch feed model or efficiency with a continuous feed system, properly selecting and maintaining your garbage disposal can significantly enhance your kitchen’s functionality and sustainability. Remember, professional installation is key to ensuring the optimal performance and longevity of your garbage disposal, safeguarding against potential issues down the line.

If you’re in Mount Vernon, Washington, and considering adding a garbage disposal unit to your kitchen ensemble or need expert advice on maintaining your current unit, Full Speed Plumbing is here to assist. Our team of seasoned professionals is equipped to provide top-notch installation and maintenance services, ensuring that your garbage disposal system operates smoothly and efficiently. 

For a consultation or to schedule services, don’t hesitate to give our team at Full Speed Plumbing a telephone call today. Elevate your kitchen’s functionality and contribute to a sustainable future with the right garbage disposal system for your home.
3 Common Dishwasher Clog Spots Unveiled

Have you ever opened your dishwasher, expecting sparkling dishes, only to find them as dirty as before? It’s frustrating, right? 

At Full Speed Plumbing, we understand the importance of a smoothly running home, and a clogged dishwasher can throw a wrench in your day-to-day life. That’s why, armed with years of expertise in plumbing services, repairs, and maintenance, we’re here to shed light on those pesky spots where clogs love to hide. 

Our mission? 

To ensure your dishwasher runs at full speed, without a hitch. 

Join our team at Full Speed Plumbing as we deep-dive into the common culprits of dishwasher clogs and share expert advice on preventing them, ensuring a seamless kitchen experience.

3 Common Locations for Dishwasher Clogs

Here are three of the most common locations for dishwasher clogs that homeowners should be aware of:

Air Gap

The air gap prevents dirty water from flowing back into the dishwasher. However, it can become the top spot for clogs. Bits of food and debris can accumulate here, obstructing the water flow. Keeping an eye on the air gap and cleaning it regularly can save you from unexpected water backflow and ensure cleaner dishes.

Drain Hose

This flexible pipe connects your dishwasher to the drainpipe under the sink or the garbage disposal. Clogs often occur when food particles, grease, or soap scum build up inside the hose. A clogged drain hose can prevent water from draining out of the dishwasher correctly, leading to standing water and potentially causing odors or further plumbing issues.

Filtration System

Dishwashers often have a removable filter to catch food particles and prevent them from redepositing on dishes. Over time, if not cleaned regularly, this filter can become so clogged that it reduces the efficiency of your dishwasher. Regular filtration system maintenance is key to ensuring your dishwasher operates smoothly, and your dishes come out sparkling clean.

By being proactive with these common clog spots, you can significantly reduce the likelihood of dishwasher woes and ensure your appliance runs efficiently. Remember, a little maintenance goes a long way in keeping your kitchen routine uninterrupted and stress-free.

Signs of a Clogged Dishwasher:

If you’re noticing that your dishes aren’t as sparkling clean as they should be, it might be due to a clogged dishwasher. Here are a few key signs to watch out for:

Water Not Draining Properly

After a wash cycle finishes, if you find water standing at the bottom of your dishwasher, it’s a clear sign of a clog. Proper draining is crucial for the dishwasher’s performance, so if water isn’t leaving the appliance as it should, it’s time to investigate further. 

Unpleasant Odors

An unmistakable sign of a clog is the smell emanating from your dishwasher. If you’re greeted by unpleasant odors when you open the door, it’s likely due to food particles or grease buildup in the system. Regular cleaning can prevent these odors, but once they’re present, it’s an alert to check for clogs. 

Visible Buildup

If you can see food particles, grease, or soap residue in the bottom of your dishwasher, around the filter, or in the air gap, you’re likely dealing with a clog. Visible buildup indicates that the water can’t flow freely and carry debris away.

By staying alert to these signs, you can prevent the inconvenience of a clogged dishwasher. When these symptoms appear, regular maintenance and prompt action can save you from unwanted headaches down the line. Remember, a little attention goes a long way in ensuring your dishwasher runs smoothly and supports a stress-free kitchen environment.

Preventing Dishwasher Clogs

Regular dishwasher maintenance and cleaning are crucial for optimal performance and longevity. A well-maintained dishwasher not only ensures clean, spotless dishes but also contributes to a healthier, more hygienic kitchen environment. 

To prevent common dishwasher clogs, here are key practices:

  • Regular Cleaning: Make it a habit to regularly clean the filters and spray arms of your dishwasher. This prevents the accumulation of food particles and grease, which are the primary causes of clogs.
  • Rinse Dishes: Although modern dishwashers are quite powerful, rinsing dishes before loading them can significantly reduce the risk of clogs by minimizing the food debris entering the system.

Tips for Proper Usage of Detergents

Do you struggle every time it comes to using a dishwashing detergent? You’re not alone. That’s why we’ve put together a useful list of tips that you can use:

  • Right Amount: Use the correct amount of detergent as recommended by the manufacturer. Excessive detergent can lead to soap residue buildup, while too little may not effectively clean the dishes.
  • Suitable Type: Choose a detergent that is specifically designed for dishwashers. Regular soap or liquid detergents for hand-washing dishes can create too many suds, leading to clogs and inefficiencies.
  • Regular Maintenance Checks: Occasionally, run a maintenance wash by setting your dishwasher on its highest temperature cycle without dishes. This can be done with a specialty cleaning agent or a simple home solution like vinegar in a dishwasher-safe container placed on the top rack. This helps in removing any built-up grease and limescale, ensuring smooth operation.

Adopting these preventative measures and utilizing detergents appropriately can significantly reduce the likelihood of dishwasher clogs, maintain the appliance’s efficiency, and extend its lifespan. A proactive approach to dishwasher maintenance saves time and money in the long run and keeps your dishes sparkling after every wash.

Conclusion

Maintaining a dishwasher in top condition requires awareness and regular maintenance. By understanding the standard locations for dishwasher clogs—such as the air gap, drain hose, and filtration system—and recognizing the signs of these clogs, including standing water, unpleasant odors, and visible buildup, homeowners can take proactive steps to prevent these issues. 

Implementing preventative measures, such as regular cleaning, appropriate rinsing of dishes before loading, and correct usage of detergents, can significantly reduce the occurrence of clogs. These actions ensure that your dishes emerge spotlessly clean and contribute to your dishwasher’s efficiency and longevity, making your kitchen routine smoother and more hygienic.

For those who may need professional assistance or have concerns about their dishwasher’s performance, Full Speed Plumbing in Mount Vernon, Washington, stands ready to provide expert help. Whether it’s routine maintenance, addressing clogs, or upgrading your dishwasher, our team is committed to ensuring your appliance operates flawlessly. 

Give us a telephone call today to ensure your dishwasher continues to support a stress-free kitchen environment.

Toilet Bubbling When Taking a Shower? Here’s What to Do

Experiencing a bubbling toilet while in the shower can be perplexing and a tad worrying. It’s one of those moments that make you pause and think, “Wait, that’s not supposed to happen, right?”. 

Well, at Full Speed Plumbing, we understand how these little (or sometimes big) plumbing inconveniences can disrupt your day. That’s why we’re here with expert advice to guide you through identifying the problem and taking the necessary steps towards a solution. Whether it’s a simple cleaning fix or something requiring more expertise, we’ve got your back. 

Stick around as we unravel this bubbly mystery and provide you with all the know-how to get your plumbing system running smoothly again.

Possible Reasons Why Your Toilet Is Bubbling When You Take a Shower

Here are some potential reasons why your toilet bubbles when you take a shower:

Drain Venting Issues

One common culprit could be issues with your plumbing vents. These are designed to regulate the pressure within your plumbing system, allowing wastewater to flow out smoothly and letting fresh air in. If these are blocked or not functioning correctly, it can lead to pressure imbalances that cause bubbling in your toilet.

Partial Clogs in Pipes

Another potential reason might be partial clogs within your plumbing system. Over time, hair, soap remnants, and other debris can build up, restricting water flow. When you shower, the additional water trying to move past these partial clogs can force air back up through the toilet, leading to those unexpected bubbles.

Obstruction in Sewer Line

Severe bubbling can also indicate an obstruction in the main sewer line. Whether due to tree roots invading the pipes or a buildup of waste material, this can significantly impact your home’s plumbing. It constrains the path for water and air, potentially causing bubbles or backflow into your home.

Air Bubbles in Toilet Trap

Lastly, the bubbling might be due to trapped air in the toilet’s P-trap. This U-shaped pipe holds standing water to prevent sewer gasses from entering the home. However, when air gets trapped in this section due to pressure changes, it may escape through the toilet bowl as bubbles during your shower.

What Can You Do To Address The Problem?

Are you tired of hearing your toilet bubble every time you want to take a refreshing shower? Be sure to give the following tricks a try:

  1. Inspect and Clean the Vent Stack: First, check the roof for your plumbing vent stack. Debris, leaves, or even bird nests can block these vents. Clean any blockage to restore proper airflow and pressure balance within your plumbing system.
  2. Plunge Gently: Using a plunger, gently plunge the toilet to dislodge any minor clogs causing the bubbling. Do not plunge too vigorously, as this could exacerbate the problem.
  3. Use a Plumbing Snake: For stubborn clogs that a plunger can’t clear, consider using a plumbing snake in the toilet and the shower drain. This unique plumbing tool can help break up and remove clogs further down the pipes.
  4. Check for Sewer Line Issues: If the problem persists, the issue may lie with the main sewer line. This task is usually best left to professionals, so consider calling a plumber to inspect for any signs of tree root intrusion or other blockages in the sewer line.
  5. Flush the Lines: Running a hose down the vents from the roof can help clear minor blockages and allow for proper venting. Be cautious and make sure the water pressure isn’t too high to avoid water backup.

By taking these steps into consideration, you can address and resolve the puzzling scenario of your toilet bubbling when showering. Remember, consistent maintenance and prompt attention to minor issues can prevent more significant problems.

Preventative Measures and Routine Maintenance

Maintaining a healthy plumbing system in your bathroom doesn’t have to be complex or time-consuming. By adopting some simple, routine actions, homeowners can significantly reduce the likelihood of plumbing problems, such as a bubbling toilet when showering. 

Be sure to review these practical tips if you want to keep your bathroom plumbing in top condition:

  • Regular Drain Cleaning: Make it a habit to clean your drains regularly. Use a simple mixture of vinegar and baking soda (followed by hot water) to break down soap scum and minor blockages. This natural cleaning solution is gentle on the pipes and can prevent buildup that leads to clogs.
  • Avoid Chemical Drain Cleaners: While they may seem like a quick fix, chemical drain cleaners are incredibly harsh and can damage your pipes over time. If you’re dealing with a stubborn blockage, mechanical cleaning methods like plunging or snaking are safer and often more effective.
  • Use Drain Screens: Place mesh screens over your shower and bathtub drain to catch hair and soap particles. This simple preventive measure can drastically reduce the debris entering your plumbing system, keeping water flowing smoothly.
  • Be Mindful of What You Flush: Not everything can (or should) be flushed down your toilet. Items labeled as “flushable”, like specific wipes and feminine hygiene products, can create blockages and stress on your plumbing system.
  • Schedule Annual Inspections: Consider having a professional plumber perform an annual inspection of your plumbing system. They can pinpoint and address potential issues before they become major problems, saving you time and money in the long run.

By integrating these tips into your home maintenance routine, you can ensure that your bathroom plumbing remains healthy, reducing the chance of unexpected issues like bubbling toilets. Remember, a little precaution and regular care can go a long way in maintaining the efficiency and longevity of your home’s plumbing system.

Conclusion

In conclusion, a bubbling toilet during a shower is more than a minor inconvenience; it’s a sign that your home’s plumbing system may need attention. From blocked vent stacks and partial pipe clogs to more significant sewer line obstructions, various issues could be causing this problem. 

Fortunately, by following the practical steps outlined—from simple DIY solutions like vent stack inspection and drain cleaning to seeking professional help for more complex sewer line issues—you can effectively address and resolve these plumbing puzzles. Investing in a regular maintenance program and preventive measures is key to ensuring the smooth operation of your bathroom’s plumbing and building a more efficient living space.

Should you encounter persistent or complicated plumbing issues, don’t hesitate to call the experts. Full Speed Plumbing in Mount Vernon, Washington, is ready to assist you with any plumbing challenges you face and ensure your system operates efficiently and effectively. 

Contact us today for professional, reliable service that keeps your home’s plumbing in top condition.

6 Most Common Causes of Clogged Drains At Home

At Full Speed Plumbing, we understand the frustration and inconvenience that clogged drains can cause in your daily life. As professional plumbers with years of expertise, we’ve seen firsthand the impact a seemingly minor issue can have on your home’s comfort and functionality. 

To empower you with knowledge and help you tackle the problem efficiently, we’ve compiled a list of the six most common causes of clogged drains. From the kitchen to the bathroom, we aim to provide insider tips to prevent these common issues and maintain seamless plumbing.  

Keep reading for expert advice that will change how you think about your home’s plumbing system.

Recognizing the Signs of Clogged Drains

As a homeowner, you must be able to identify when one of your drains is clogged. Countless things can indicate that one of your drains is clogged, but some are more common than others. Some of the most common signs include:

Slow Draining Water

One of the most apparent signs that one of your drains is clogged is water starts draining more slowly than usual. If you notice that water pools in the sink or the bathtub take longer to empty, it might indicate a blockage restricting water flow.

Unpleasant Odors

Persistent and unpleasant odors coming from your drain could be signaling a clog. Organic matter trapped inside the pipes often decomposes and emits a foul smell that is hard to ignore.

Gurgling Sounds

Any unusual gurgling sounds from your drains could be a cry for help. These noises suggest that air is trapped in your pipes due to a blockage and is finding its way out as water displaces it.

Water Backup

A clear indication of a clogged drain is water backing up from a drain or plumbing fixture. If water re-emerges after you run the tap, it suggests that a clog is preventing water from flowing through the system properly.

The Top Causes of Clogged Drains

Now that you know how to tell that one of your drains is clogged, it’s time to determine what caused the clog in the first place. Although it may be hard to figure out without professional assistance, chances are the clog was caused by one of the following culprits:

  1. Hair Build-Up: A common culprit for clogged drains, particularly in showers and bathroom sinks. Hair can bind with grease and other substances, forming clogs preventing water flow.
  2. Soap Scum: The residue from soap combines with minerals in water to form a hard residue known as soap scum, which can narrow pipes and hinder water movement.
  3. Food Waste: Even with a garbage disposal, certain food waste shouldn’t go down the kitchen sink. Food scraps can create stubborn blockages, especially if they’re not broken down properly.
  4. Grease/Oil: Grease and oil from cooking can solidify within the plumbing, trapping other waste and building up over time to form a significant blockage.
  5. Non-Flushable Items: Flushing items like wipes, sanitary products, or cotton pads can lead to severe clogs since these items do not disintegrate easily in water.
  6. Mineral Build-up: In areas with hard water, minerals dissolved in the water can accumulate and create insoluble masses, which can obstruct water flow and clog pipes.

Regular Cleaning and Maintenance to Prevent Clogs

A consistent maintenance schedule for your plumbing system is crucial for a functional and healthy home environment. Just like any other aspect of your house, your plumbing system requires regular attention and care to prevent inconveniences and potential damage. 

By employing simple home remedies, such as hot water flushing, baking soda and vinegar solutions, and enzymatic cleaners, you can keep your pipes clear and ward off build-up. 

Although these remedies can be effective for minor maintenance, the importance of professional cleaning services cannot be overstated. Professional plumbers come equipped with unique tools and expertise to thoroughly clean and maintain your plumbing system, ensuring it runs smoothly and preventing costly repairs down the line.

Questions to Ask Before Hiring a Plumbing Expert

Are you thinking about contacting a plumbing service to clear out your clogged drains? If so, we suggest asking the following questions before giving them any of your business:

Are You Licensed and Insured?

This question ensures that the plumber has the necessary qualifications to perform the work and protects you from liability in the event of accidents or injuries during the service call.

What Is Your Level of Experience?

Understanding how long they’ve been in the industry and the types of plumbing jobs they’ve handled can gauge their proficiency in addressing your specific plumbing concerns.

Can You Provide References or Reviews?

Asking for references or directing you to online reviews can help establish credibility and give insight into their track record with past clients.

What Are Your Specialties?

Some plumbers specialize in certain areas, and knowing this can be critical if your issue requires specific expertise, such as water heater repairs or sewer line inspections.

Do You Offer Upfront Pricing?

Understanding their pricing policy is important to avoid hidden costs or surprises on your bill after the service is completed.

What Is Your Availability in Case of an Emergency?

Plumbing emergencies can occur at any time. Knowing if they offer emergency services and response times can be vital when urgent situations arise.

Will You Perform a Detailed Assessment Before Starting the Project?

Professionals should conduct a thorough examination to assess the issue accurately and provide the most effective solution.

Following this set of structured questions can help ensure that you’re hiring a reliable plumbing expert who will deal with your plumbing needs and get you the result you’re looking for.

Conclusion

In summary, recognizing the signs of a clogged drain early on — such as slow drainage, unpleasant odors, gurgling sounds, and water backup — is essential to mitigate the risks and inconveniences associated with plumbing issues. 

Some of the most common causes, like hair build-up, soap scum, food waste, grease, non-flushable items, and mineral build-up, can be addressed with regular home care and the assistance of professional plumbing services. 

Asking the right questions before hiring a plumbing technician ensures that you receive qualified and reliable service. Remember, consistent maintenance is key to a trouble-free plumbing system. 

Don’t wait for a full-blown crisis; reach out to our trusted team at Full Speed Plumbing for a comprehensive assessment and expert maintenance. Keep your drains clear and water flowing smoothly by contacting us today for exceptional customer service and peace of mind.

Contact one of our team members today for more information.

Expert Guide To Adjusting Toilet Flush Valves

Are you having trouble with a toilet that won’t flush right or keeps running? You’re not alone. Many homeowners experience these common yet frustrating issues. But fear not, Full Speed Plumbing is here with expert insights! 

In this guide, we’ll show you how to tackle toilet flush valve adjustments, a key maintenance task that can save you water and prevent future headaches. Stick with us as we dive into the nuts and bolts of keeping your toilet in tip-top shape.

What is a Toilet Flush Valve?

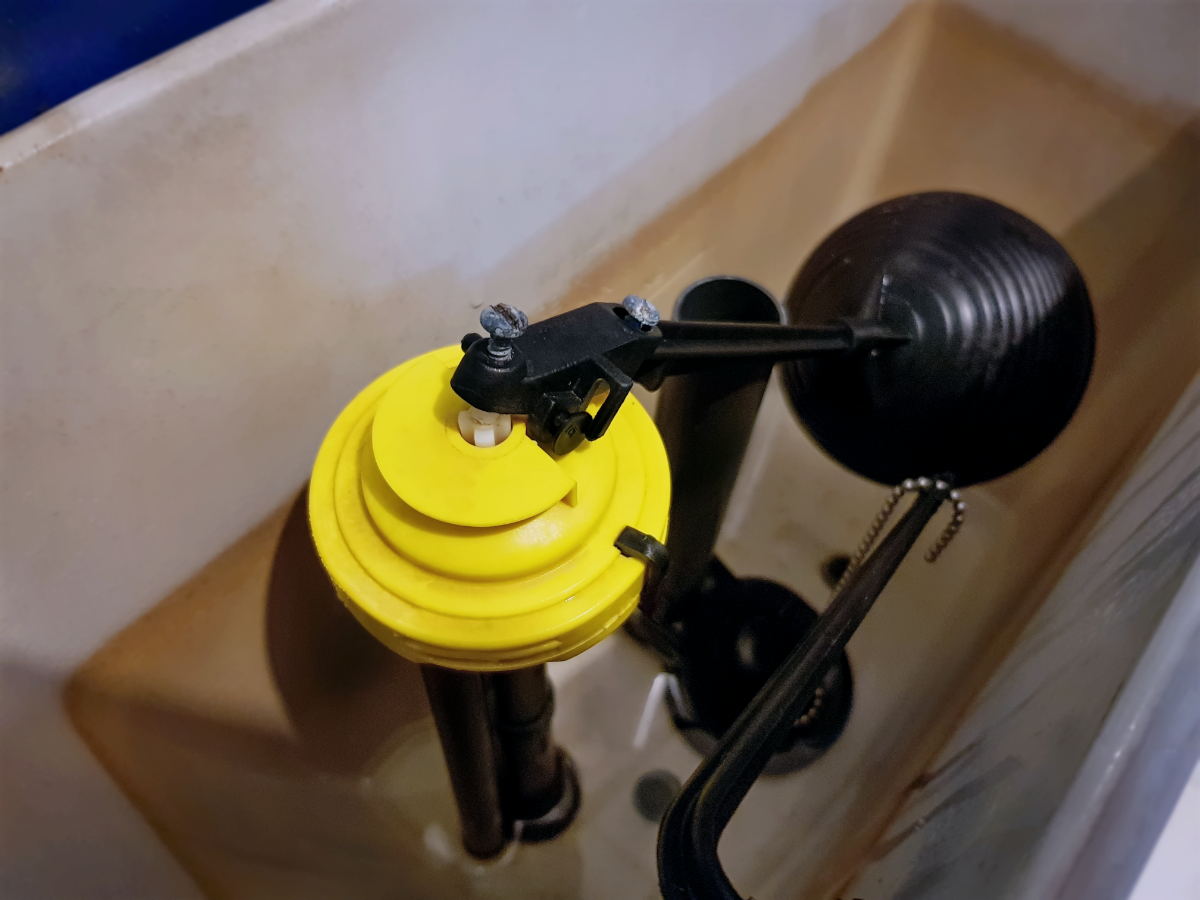
A toilet flush valve is the heart of the flushing mechanism inside your toilet tank. This product plays a crucial role in beginning and ending the flushing process. When you push the flush lever, the valve opens, allowing water to rush from the tank into the toilet bowl, facilitating the swift removal of waste. After flushing, the valve closes, permitting the tank to refill for the next use. 

Not only is it essential for effective toilet operation, but a well-adjusted valve also contributes to water conservation and reduces the likelihood of continuous water running in your bathroom, which can be both annoying and costly.

Recognizing a Faulty Flush Valve

If your toilet isn’t performing as expected, it could very well be due to a faulty flush valve. Here are some telltale signs to watch out for:

  • Erratic or Weak Flushing: If your toilet flush is consistently weak, the flush valve may not be releasing water properly.
  • Constant Running Water: A toilet that continues to run long after flushing usually points to a flush valve that isn’t sealing correctly.
  • Water Trickling into the Bowl: Noticeable trickling water into the toilet bowl between flushes is a classic symptom of a flush valve that may need adjustment or replacement.
  • Difficulty in Flushing: When the flush lever is hard to operate or doesn’t initiate a flush, the linkage to the flush valve might be obstructed or misaligned.

By keeping an eye out for these issues, you can act promptly to correct your flush valve, ensuring your toilet operates efficiently and saves water.

Adjusting the Flush Valve: Step-by-Step Guide

Adjusting your toilet’s flush valve is straightforward and doesn’t require a plumber. Just follow these simple steps:

1. Shut Off the Water Supply

Start by turning off the water supply to your toilet to prevent any spillage during your adjustment. The valve’s location can vary, but it’s typically located behind the toilet near the floor.

2. Remove the Toilet Tank Lid

Carefully lift the lid off of your toilet tank and set it aside in a safe place to avoid any damage. It’s usually heavy, so it’s best to use both hands.

3. Inspect the Flush Valve and Connecting Parts

Examine the flush valve located at the bottom of the tank. Make sure to check for any signs of wear or damage to the valve itself and the connecting parts, including the chain and the seal.

4. Adjust the Flush Valve

If the chain is too slack, shorten it to ensure that it lifts the valve enough to release water. If the seal is worn out, consider replacing it to prevent leaks.

By completing these steps, your toilet should operate more efficiently. Remember to turn the water supply back on and give the toilet a few test flushes to ensure everything works correctly.

Water-Saving Tips Related to Toilet Flush Valve Adjustment

Conserving water is beneficial for the environment and can lead to significant savings on your water bill. 

By implementing these simple water-saving tips related to toilet flush valve adjustments, you can boost the efficiency and overall performance of your toilet:

  • Check for Leaks Regularly: A small leak can waste a lot of water over time. Conduct periodic checks to ensure your flush valve is not leaking.
  • Upgrade to a Dual-Flush Valve: Consider installing a dual-flush valve, which gives you a choice between a forceful flush for solid waste and a weaker flush for liquid waste, saving a substantial amount of water.
  • Adjust the Float: Lowering the float in your toilet tank will reduce water usage per flush. Be careful not to set it too low, or it might affect the flushing power.
  • Replace Worn-Out Parts: If parts of the flush valve are worn, you should shop around for a replacement part. A good seal is crucial to prevent water from trickling constantly into the bowl.
  • Don’t Use the Toilet as a Wastebasket: Each unnecessary flush can waste gallons of water, so avoid flushing down anything that could just as easily be thrown in a trash can. Additionally, using your toilet as a garbage disposal unit can also lead to toilet clogs, which can cause further issues down the line.

By following these steps, you can ensure that your toilet is not only running smoothly but is also conserving water effectively.

Scenarios Suitable for DIY Toilet Flush Valve Repair

If you’re a homeowner, DIY repair can be a satisfying and cost-effective solution for some common toilet flush valve problems. Here are several scenarios where you might consider a DIY approach before calling in the pros:

  • Flapper Replacement: If the flapper inside the tank deteriorates or warps over time, replacing it is a relatively simple task that requires minimal tools.
  • Chain Adjustment: Sometimes the chain attached to the flapper is too long or too short, affecting the flush. An adjustment may be all that’s needed.
  • Gasket Seals: Over time, the gasket that seals the connection between the tank and the bowl can wear out. Replacing the gasket can resolve leaks or unusual sounds during flushing.
  • Handle Issues: If the flush handle is loose or fails to activate the flush, tightening the set nut or replacing the handle are straightforward DIY fixes.

Signs It’s Time to Call a Professional Plumbing Service

Recognizing when a problem is beyond a simple DIY fix is key to preventing further damage. Here’s when you should consider calling a residential plumbing service to visit your home:

  • Recurring Problems: If an issue keeps returning despite your best DIY efforts, it likely indicates a deeper problem that a professional should solve.
  • Constant Running or Overflowing: When your toilet is overflowing or running non-stop, and adjustments aren’t helping, a plumber should assess the underlying cause.
  • Low Water Pressure: If adjustments to the flush valve don’t address weak flushing and you notice low water pressure elsewhere, this could signify a more complex issue.
  • Visible Damage to Pipes or Porcelain: Cracks or damage to the toilet bowl, tank, or pipes can lead to significant water damage and warrant professional intervention.
  • Inaccurate Water Level: If the water level in the tank is too low or high, even after float adjustments, a plumber can diagnose and fix the root of the problem.

By evaluating these scenarios and signs, you can decide whether a flush valve issue is a DIY project or if it’s time to call in a professional.

Conclusion

Whether you’re a DIY enthusiast poised to tackle common toilet flush valve issues or you’ve encountered more complex challenges requiring a professional touch, Full Speed Plumbing in Mount Vernon, WA, is here to assist. Whether you need a simple repair or have to replace a plumbing fixture in your living space, you can rely on our team.

Our seasoned experts are committed to providing high-quality customer service while helping you conserve water and save money. Don’t let plumbing problems disrupt your life. Call us or visit our website to schedule an appointment and give your toilet the expert care it deserves.

How to Fix A Leaking Shower Head: 6 Different Ways to Try

Experiencing a leaking shower head can be more than a simple annoyance; it’s a maintenance issue often pointing to a more significant problem within your plumbing system. At Full Speed Plumbing, we understand the importance of a timely and effective service. That’s why we’ve put together this straightforward guide. 

Whether you’re dealing with a minor drip or a major leak, we aim to provide practical solutions that ensure your shower is functioning at its best. Join us as we turn this common household challenge into an opportunity for home improvement and learning.

Possible Reasons Your Shower Head Is Dripping

Have you been wondering why your shower head has been dripping? It can be difficult to pinpoint, but chances are, the dripping is caused by one of the following issues:

Worn-out Washer or O-Ring

Often, the culprit behind a leaky shower head is a worn-out washer or O-ring. These small but essential components create a watertight seal and, over time, can become stiff, brittle, or degrade, allowing water to escape even when the shower is off.

Clogged Nozzles Creating Pressure Buildup

Mineral deposits from water can accumulate in your shower head’s nozzles, leading to blockages. This obstruction can result in pressure buildup within the shower head, often causing leaks at weak points or connections.

Loose Connections

A shower leak may also stem from connections in the shower arm or the shower head that have become loose. Regular use can sometimes cause these connections to lose their tight seal, making it necessary to re-tighten or reseal them to prevent water from dripping out.

By pinpointing the exact cause of the leak, you’ll be on your way to a DIY fix that restores your shower to perfect working order. Remember, if you’re ever unsure of what choice to make, it’s best to consult a professional plumber to avoid potential damage.

6 Different Techniques For Fixing Shower Head Leaks

Before you try to deal with your dripping shower head by yourself, we suggest that you review the following techniques. Learning about the different methods for fixing a dripping shower head gives you a better idea of which approach will provide you with the best results:

1. Replace the Washer or O-Ring

First, ensure the main water supply is off. Disassemble the shower head carefully to locate the defective washer or O-Ring. Replace it with a new one that matches the size and shape needed for a snug fit.

2. Clean the Nozzles

Soak the shower head in a solution of white vinegar and water (equal parts) for several hours. Afterwards, use a small brush to gently remove any remaining mineral deposits and debris from the nozzles.

3. Tighten Loose Connections

Using a tool like a wrench or pliers, check the connections for the shower arm and shower head. 

4. Apply Plumber’s Tape to Prevent Leaks

Wrap the plumber’s tape around the threads of the shower arm to secure a leak-free seal when you reattach the shower head.

5. Check for Cracks and Damage

Inspect the shower head for any visible signs of cracks or damage. If found, replacing the entire shower head may be more cost-effective than attempting a repair.

6. Regular Maintenance

Regularly clean and inspect your shower head to prevent future leaks. A well-maintained shower head will not only work better but also last longer.

Remember to always turn off your water supply before attempting any repairs to avoid further issues in your bathroom. If these DIY solutions don’t resolve the problem, it might be time to call in a professional plumber.

6 Tools Needed For DIY Shower Head Leak Repairs

To successfully execute a DIY repair on a leaking shower head, you’ll need to gather the following tools:

  • Adjustable Wrench: Necessary for tightening connections and ensuring a secure fit without stripping the hardware.
  • Screwdriver Set: A variety of screwdrivers may be required to disassemble the shower head for internal repairs.
  • Replacement Washer or O-Ring: These create a seal within the shower head to prevent leaks and should be replaced if worn out.
  • Plumber’s Tape: Also known as Teflon tape, this is used on the threads of pipe connections to ensure a watertight seal.
  • Clean Cloth: Useful for wiping down components during the repair process.
  • Vinegar: Natural and effective, vinegar helps dissolve mineral deposits that can clog nozzles and cause leaks.

Professional Plumbing Services Vs. DIY Solutions: What’s the Right Option For You?

When encountering a minor shower head leak, many homeowners will find that they can address this issue with some DIY prowess. 

You can often remedy a reasonable leak by following simple steps like replacing a worn washer or O-ring, cleaning blocked nozzles, or tightening loose connections. However, it’s crucial to recognize when a job exceeds your skill set or the problem’s complexity. 

For more severe leaks or if you’re facing plumbing issues that go beyond basic fixes, it’s imperative to contact a professional plumber to conduct an inspection. 

Professionals possess the requisite tools, experience, and in-depth knowledge to diagnose and effectively solve plumbing problems that might otherwise lead to costly water damage or inefficient water use. Remember, while DIY can be a learning opportunity and a way to save money, relying on experts ensures the longevity and reliability of your home’s plumbing system.

Conclusion

Resolving a leaky shower head can often be a simple and satisfying DIY project. Whether it’s replacing a worn-out washer or O-Ring, unclogging nozzles, tightening loose connections, applying plumber’s tape, checking for damage, or conducting regular maintenance, these steps can prolong the life of your shower fixtures and improve efficiency.

However, it’s always important to know when to call on the expertise of a professional. If you’ve tried these techniques and still face issues, or if you prefer the reassurance of expert workmanship, Full Speed Plumbing in Mount Vernon, Washington, is here to help. Reach out to us for dependable services that guarantee peace of mind and a leak-free shower.

Don’t let your leaking shower drain your bank account; call Full Speed Plumbing or visit our website for top-notch plumbing solutions that keep your living space in perfect flow!

Why Is Your Garbage Disposal Not Draining Properly?

Have you ever encountered the nuisance of a garbage disposal that just won’t drain? You’re not alone! 

At Full Speed Plumbing, we understand that your kitchen is the heart of your home, and maintaining its functionality is a top priority. Whether a simple service fix or an essential maintenance routine, staying one step ahead can mean the difference between a minor hiccup and a plumbing nightmare. 

Let’s dive into the common culprits of clogged garbage disposals and how to get things running smoothly again.

10 Potential Reasons Why Your Garbage Disposal Won’t Drain Correctly

Many families rely on their garbage disposal units daily, so it can be quite a nuisance when it doesn’t drain correctly. There are countless reasons why your garbage disposal isn’t draining correctly. Some of the most common examples include:

Food Build-Up

Food particles that accumulate over time can create a stubborn blockage. Regular rinsing and occasional deep cleaning are necessary to prevent this build-up.

Foreign Objects

Non-food items like utensils or sponges inadvertently slipping into the disposal can obstruct the drain. Always check for foreign objects before switching on the disposal.

Grease and Oil

Grease and oil can solidify within the plumbing, leading to significant drainage issues. Disposing of these substances in the trash rather than down the sink is best.

Overfilling

Cramming too much waste at once into the disposal can overwhelm the system. To avoid clogs, feed waste gradually and give it time to grind and pass through.

Worn Blades

Dull blades are less effective at chopping up food waste, which can lead to larger chunks clogging the drain. Blades should be kept sharp or replaced as needed.

Drain Pipe Blockage

Clogs can form further down the plumbing line, not just in the disposal itself. If problems persist, the issue might be in the drain pipes.

Maintenance Neglect

Like any other appliance, garbage disposals need regular upkeep. Not adhering to a maintenance schedule can lead to preventable malfunctions. Schedule periodic checks to ensure everything is in working order.

Electrical Issues

Sometimes, the problem isn’t mechanical but electrical. A tripped breaker or faulty wiring might prevent the disposal from operating correctly. Always exercise caution and consider professional help when dealing with electrical components.

Incorrect Installation

Improperly installed units are prone to problems, including drainage issues. Ensure that your garbage disposal is installed by a certified professional to avoid such setbacks.

Aging Disposal Systems

Over time, wear and tear can affect the efficiency of your garbage disposal. If your disposal is old and has been in service for many years, it may be time to consider a replacement.

By identifying and understanding these additional factors, you’ll be better equipped to diagnose and address any draining issues with your garbage disposal. Regular cleaning, proper use, and timely maintenance are the keys to keeping your kitchen sink in prime condition. If you’ve gone through this checklist and the problem persists, it may be time to call in the experts at Full Speed Plumbing.

DIY Troubleshooting Tips for a Non-Draining Garbage Disposal

If you enjoy taking on projects around the house or trust your DIY skills, there are several troubleshooting tips that you can use to deal with your non-draining garbage disposal. These troubleshooting tips include:

Safety First

Before attempting any DIY troubleshooting, make sure to disconnect the garbage disposal from its power source to prevent any accidents. Always use tools and wear protective gloves for safety.

Inspect for Obstructions

  1. Visual Check: Use a flashlight to look inside the disposal for any obvious obstructions. If you spot any foreign objects, use tongs or pliers to remove them carefully.
  2. Manual Rotation: If your disposal has a hex hole underneath, use an Allen wrench to turn the blades manually. This can help dislodge any items stuck in the unit.

Reset the Disposal

  1. Find the Reset Button: Locate the red reset button on the bottom of the disposal unit.
  2. Press the Reset Button: Firmly press the button and wait a few minutes. Turn the power back on and test the disposal.

Check for Clogs

  1. Drain Inspection: If there is standing water, use a sink plunger to attempt to clear any clogs in the sink.
  2. P-trap: Place a bucket underneath the P-trap and unscrew it. Clear any trapped debris and reattach the P-trap, ensuring it’s tight and secure.

Test the Blades

  1. Check Blade Movement: After clearing any obstructions and ensuring the disposal is still powered off, use a wooden spoon handle to gently nudge the blades. This can indicate if they are moving freely or if there’s a mechanical issue.

Evaluate the Impeller

  1. Inspect for Wear: With the disposal off, inspect the impeller for signs of wear or damage. If the impeller is damaged, it may be best to call a professional.

Professional Assessment

If these steps don’t resolve the issue, it’s likely time to involve a certified plumber. DIY repairs have their limits, and a professional can ensure the safety and functionality of your garbage disposal.

By methodically following these tips, you can safely attempt to fix a non-draining garbage disposal. If at any point you feel unsure or if the problem persists, do not hesitate to contact Full Speed Plumbing for reliable and efficient service.

Conclusion

In conclusion, a non-draining garbage disposal can be more than just an inconvenience; it can be a symptom of various issues, ranging from simple blockages to more complex mechanical or electrical problems. 

By following the detailed troubleshooting guide we’ve discussed, homeowners can address many common problems on their own. Remember, safety is paramount, and regular maintenance is key to extending the life of your disposal.

Should your issues persist after applying these tips or if you’re not comfortable performing DIY repairs, Full Speed Plumbing stands ready to assist. Our team of certified experts in Mount Vernon, Washington, is equipped to tackle any plumbing challenge, ensuring everything flows smoothly in your home. 

Don’t let a clogged disposal disrupt your daily routine. Contact Full Speed Plumbing today for reliable and swift service that gets your kitchen back in order posthaste.

Are you looking for a swift solution to your plumbing woes? Call Full Speed Plumbing or visit us online to schedule an appointment and experience the best customer service in the industry.

What Is A Sewer Ejector Pump And How Does It Work?

Have you ever been curious about the unsung heroes of your plumbing system? 

At Full Speed Plumbing, we want to introduce you to one such vital gadget that often goes unnoticed – the sewer ejector pump. It’s your home’s key player for efficient wastewater disposal when gravity alone won’t do the trick.  

Let’s dive in and unravel the mystery of how this device keeps your basement or low-level plumbing fixtures functioning seamlessly without any messy complications. Stay tuned as we demystify the workings of a sewer ejector pump!

Everything You Need to Know About Sewer Ejector Pumps

A sewer ejector pump is critical to your house’s plumbing system, particularly if you have bathrooms, laundry rooms, or any plumbing fixtures below the main sewer line grade. 

This nifty device ensures that all the wastewater from these low-lying areas is effectively pumped up and out into the sewer system. As a homeowner, understanding the function of a sewer ejector pump can save you from potential flooding disasters. When wastewater enters the pump basin to a certain level, a float switch activates the pump. 

Then, with professional robustness, the pump propels the wastewater upwards, merging with the main sewer line, safeguarding your home against any unsanitary backflow or floods. 

By relying on a sewer ejector pump, you not only enhance the functionality of your home’s plumbing but also protect your living space from potential damage and costly repairs.

Sewer Ejector Pump Vs Sump Pump: Understanding the Distinctions

While sewer ejector sumps and sump pumps play vital roles in your home plumbing system, they serve different functions. Here’s a breakdown of their unique features and applications:

Sewer Ejector Pumps

Here are some of the key features of sewer ejector pumps:

  • Waste Management: Designed to handle and transport wastewater from below-ground plumbing fixtures to the sewer line.
  • Application: Ideal for homes with bathrooms or laundry rooms in the basement where the waste needs to be lifted to the main sewer line.
  • Handles Solids: Can manage small solids, making it suitable for toilets and sinks.

Sump Pumps

Here’s some useful information about sump pump units:

  • Water Diversion: Aimed at preventing water accumulation in basements or crawl spaces by pumping out excess groundwater.
  • Application: Used in situations prone to flooding or heavy rainfall to keep lower areas of your home dry.
  • Water-Only: Typically handles clear water without solids, which excludes its use with toilets or sinks.

Situation-Specific Applications: When to Use Each Type of Pump

Although they are somewhat similar, both sewer ejector and sump pumps have different applications.

  • Sewer Ejector Pump: Employ a sewer ejector pump when you have plumbing fixtures below the main sewer line needing to transport both liquids and solids to the sewer.
  • Sump Pump: Use a sump pump in areas that collect water (like basements or crawl spaces) to prevent water damage and flooding, especially during wet weather conditions.

Residential Scenarios Requiring a Sewer Ejector Pump

Sewer ejector pumps are indispensable in a variety of residential scenarios, especially where basements and plumbing fixtures are located below the main sewer line. Here’s a list of common applications:

  • Basement Bathrooms: If you’re adding a bathroom to your basement, a sewer ejector pump will ensure that all wastewater reaches the main sewer line since gravity alone can’t do the job.
  • Below-grade Laundry Rooms: Homes with laundry facilities in the basement will need a sewer ejector pump to handle the water and waste produced, preventing potential plumbing disasters.
  • Sinks in Workshops or Garages: For sinks installed in lower levels or areas below the sewage line, a sewer ejector pump will be the workhorse that drives the wastewater upwards.
  • Bar or Kitchenette: If your entertainment space includes a bar or kitchenette on the lower level of your home, a sewer ejector pump is crucial for properly disposing of sink and appliance waste.
  • Sewage Lift Stations: In homes with a sewage lift station, a sewer ejector pump is a key component that carries waste from the home to the city sewer line or septic system.

Understanding where and why to use a sewer ejector pump can help maintain the functionality and hygiene of your home while protecting against potential flooding and costly water damage repairs.

Routine Maintenance Steps for Sewer Ejector Pumps

Maintaining a sewer ejector pump is crucial for its longevity and efficient operation. Here are some routine steps homeowners should adopt to ensure their pump stays in optimal condition:

  1. Regular Cleaning: Clear the pit of any debris that could clog the pump’s intake. This includes items that should not go down the drain, such as sanitary products or hard solids.
  2. Inspecting the Vent: Ensure the vent pipe is not blocked. A clear vent pipe is essential for proper function and to avoid negative pressure that can hinder the effectiveness of the pump.
  3. Checking the Valves: Test the check valve regularly to avoid any backflow of sewage into the basin, which can cause the pump to work harder and increase wear and tear.
  4. Float Switch Testing: Confirm that the float and the switch are functioning smoothly without any restrictions or hang-ups.
  5. Alarms: If your system includes an alarm, test it periodically to ensure it alerts you to any potential problems before they become serious issues.

Scheduling an Inspection with a Professional Plumber

  • Regular professional inspections are paramount to the care of sewer ejector pumps. A professional can conduct a thorough examination and perform any needed maintenance or repairs, ensuring the system operates as intended.
  • During these inspections, experts will also look for signs of wear, and they can make recommendations on parts that might need to be replaced soon, preventing unwanted failures.
  • Professionals are also able to spot issues that a homeowner might miss, such as electrical problems or small leaks, which could lead to more significant complications down the road.

Proper care and professional oversight of your sewer ejector pump install confidence in your home’s waste management system. By sticking to these maintenance guidelines, you guard against unexpected malfunctions and contribute to the overall health of your plumbing infrastructure.

Conclusion

Understanding the distinct roles and maintenance necessities of sewer ejector pumps and sump pumps is critical for safeguarding your home against water damage and ensuring a hygienic environment. At Full Speed Plumbing in Mount Vernon, Washington, we are dedicated to providing exceptional service and expertise for your home’s plumbing needs. Don’t let plumbing issues disrupt your life.

Give us a telephone call or visit our website to schedule an inspection or service appointment. Ensure peace of mind with our experienced professionals who stand ready to optimize your home’s plumbing performance. Act now to keep your home dry, clean, and functioning efficiently with Full Speed Plumbing – where your plumbing runs at full speed!

Water Softener vs Water Filter: Which One Do You Need?

At Full Speed Plumbing, we understand the importance of clean and safe water in your homes. This is not only crucial for your health but also for the longevity of your appliances. However, navigating the choices between a water softener and a water filter can be daunting. You might ask yourself, “Which solution do I need?”. 

Today’s blog post is a comprehensive guide to help you make an informed decision, understand the differences between the two, and solve any water-related problems you may have. We aim to provide you with top-notch service and ease your journey towards achieving the best water treatment system for your home.

What is a Water Softener?

A water softener is a device designed to help homeowners solve the problem of hard water. But what exactly is hard water? 

Hard water contains high concentrations of minerals like calcium and magnesium. While these minerals don’t harm your health, they can create nuisances around your home. You might notice a chalky residue on your dishes, fading clothes, dry skin and hair, or a shortened lifespan of your home appliances.

So, how does a water softener work? Simply put, it uses a process called ion exchange. As hard water enters the softener, it flows over resin beads charged with sodium or potassium ions. These ions swap places with the calcium and magnesium, softening the water. 

The result? A significantly improved home experience for you and your family. From softer skin and shinier hair to longer-lasting appliances and brighter laundry, the benefits of a water softener are manifold. By investing in a water softener, you’re investing in the comfort and convenience of your household.

What is a Water Filter?

A water filter, on the other hand, is a device primarily designed for purifying your water. It’s a key player in ensuring the water you consume and use in your everyday life is clean and free from contaminants. But how does a water filter achieve this?

Fundamentally, a water filter removes undesirable particles, chemicals, and microorganisms from water. It pushes the water through a physical barrier or a chemical or biological process to eliminate these impurities. The goal is to produce safe water for drinking and other household purposes.

Water filters can be directly attached to plumbing fixtures, like your kitchen sink, bathroom shower, or even the whole house. They can effectively sift out contaminants, including chlorine, lead, bacteria, and pesticides. This purification process ensures that the water you drink and cook with is healthy, tasty, and filtered to perfection.

By investing in a water filter, you are taking a proactive step towards safeguarding your health and enhancing your daily living experience. Not only do you get to enjoy purer, cleaner water quality, but you also protect your plumbing fixtures from the adverse effects of contamination. It’s a win-win for your health and home!

Water Softeners vs. Water Filters: Benefits and Limitations

Although water softeners and water filters offer a wide range of benefits, they also have a handful of drawbacks, some of which include:

Benefits of Water Softeners

Here are some of the benefits of water softeners:

  1. Enhances Home Experience: A water softener can significantly improve your home experience, resulting in softer skin, shinier hair, brighter laundry, and longer-lasting appliances.
  2. Prevents Household Nuisances: Reducing the hardness of water prevents the chalky residue on dishes and the fading of clothes.
  3. Extends Appliance Lifespan: Soft water is gentler on home appliances, extending their lifespan and improving efficiency.

Limitations of Water Softeners

Some of the limitations of water softeners include:

  1. Does Not Purify Water: While a water softener treats hard water, it isn’t designed to purify water or remove contaminants.
  2. Requires Regular Maintenance: For optimal performance, water softeners need regular maintenance and salt replenishment.
  3. Salt Usage: Some people may be concerned about the extra sodium added to their water.

Benefits of Water Filters

There are several positive aspects to water filters, including:

  1. Ensures Safe Consumption: Water filters purify water, making it safe for drinking and cooking by removing harmful contaminants.
  2. Enhances Taste: Water filters can improve the taste of your water by sifting out substances like chlorine.
  3. Protects Plumbing Fixtures: They also safeguard plumbing fixtures from the adverse effects of contamination.

Limitations of Water Filters

Lastly, the drawbacks of water filters are as follows:

  1. Does Not Soften Water:  Water filters purify water but cannot treat hard water.
  2. Limited Scope: Some filters may not be equipped to remove all types of contaminants. It’s crucial to choose one based on your specific needs.
  3. Maintenance: Similar to water softeners, water filters also require regular maintenance for effective operation.

Which Product Should You Choose?

Deciding between a water softener and a water filter is not necessarily an “either-or” choice. For the optimal home experience and the pinnacle of health and safety, we at Full Speed Plumbing recommend utilizing both a water softener and a water filter. 

The water softener will address the hard water issues, enhancing your household convenience and extending the lifespan of your appliances. Concurrently, the water filter will ensure that your water is free from harmful contaminants, safeguarding your health and enhancing the taste of your drinking water. 

If the task of installation or ongoing maintenance appears daunting, remember to contact a professional plumber from our team at Full Speed Plumbing.

We have the professional certification required to provide you with top-notch service, guiding you through every step of the way. With Full Speed Plumbing, you can rest assured that your journey toward achieving high-quality water for your home is in capable hands.

Conclusion

Achieving optimal water quality can seem complex, but with the expert guidance of Full Speed Plumbing in Mount Vernon, Washington, it’s simpler than you think. Our top-tier customer service is dedicated to easing your worries and guiding you through the process, ensuring you have the purest, cleanest, and softest water in your home. 

Say goodbye to the expense and waste of bottled water and hello to the convenience and comfort of improved water quality. Act now and contact Full Speed Plumbing to schedule an installation today.

Dealing With A Leaking Sewer Pipe in the Basement

Welcome to Full Speed Plumbing’s blog, where we offer expert advice on all things plumbing! Today, we will walk you through dealing with a vexing issue many homeowners encounter – a leaking sewer pipe in the basement. 

Thankfully, our reliable service team has got your back. With our guided steps, you can manage this issue confidently. Let’s dive right in and steer clear of those unwelcome plumbing surprises!

Recognizing the Signs of a Sewer Pipe Leak in Your Basement

Identifying the signs of a sewer pipe leak early can save you from a potentially disastrous situation. Prompt detection and action can prevent an irritating problem from becoming a major and costly home repair.

Here are the telltale signs that indicate a sewer pipe leak in your basement:

  • Unpleasant Odors: An off-putting sewage smell is one of the first signs of a leaking sewer pipe. The scent of raw sewage is potent and unmistakable. If you pick up on this nauseating aroma, it could signal a leak.
  • Water or Sewage Backup: If your kitchen sink, bathtub, shower, or toilet is experiencing backups frequently, it’s a red flag for a potential sewer line issue.
  • Mold Growth: Sewer leaks create a damp environment in which mold thrives. If you notice an unexpected mold outbreak, particularly along walls or floors, it may be due to a leaky pipe.
  • Increased Humidity: A sewer line leak can raise the basement humidity level. If the basement feels unusually humid or the air feels moist, it might be time to inspect the sewer pipes.
  • Cracks in the Foundation: Over time, sewer leaks can erode the soil around your living space, which can cause the foundation to crack. Address these issues promptly to prevent further structural damage.
  • Sounds of Running Water: Finally, if you hear the sound of running water even after all the plumbing fixtures have been turned off, there may be a leak somewhere.

5 Steps to Take When to Detect a Sewer Pipe Leak

Here’s a quick step-by-step guide that you can use after you’ve spotted a sewer pipe leak in your basement:

Step 1: Assess the Situation

First off, take a deep breath. It’s crucial to maintain composure and assess the situation calmly. Try to locate the leak’s source and the extent of the damage. If the leak is minor and contained, you can manage it temporarily. But remember, any sewer line leak, no matter how small, warrants a professional inspection.

Step 2: Protect Yourself and Your Family

Safety must always come first while dealing with a sewer leak in your basement. The health risks associated with exposure to sewage are severe. Ensure everyone in the house knows the leak and keep a safe distance. It’s also recommended to evacuate the area around the leak, especially for children, elderly members, and those with weakened immune systems.

Step 3: Contact a Professional Plumber

Next, you need to get in touch with an emergency service that specializes in plumbing leaks. Handling sewage leaks on your own is not advisable, given the potential health risks and the complex nature of plumbing systems. Provide the plumber with as much information as possible about the leak and its location. Doing this will help them get the job done efficiently.

Step 4: Review and Document the Damage

While you wait for the plumber, start documenting the damage. This could be crucial for insurance claims. Take pictures of the affected area and any property damage. Do not attempt to clean up the wastewater, as this might further contaminate the area or pose health risks.

Step 5: Notify your Insurance Provider

Finally, notify your home insurance provider about the incident. Depending on your policy, the costs for repair and cleanup might be covered. Remember to provide them with your collected documentation and cooperate fully to ensure a smooth claims process.

The Health Risks Related to Sewer Leaks

Exposure to leaking sewer pipes can lead to a wide range of harmful health issues. Here are some health risks related to sewer leaks you should be aware of:

  • E. Coli: This bacteria is commonly found in sewage and can cause serious health issues if ingested, including severe stomach cramps, diarrhea, and vomiting.
  • Salmonella: Often associated with food poisoning, Salmonella can also be present in sewage waste. Exposure can lead to symptoms like fever, diarrhea, and abdominal cramps.
  • Pinworms: These small, white, parasitic worms can lay their eggs in the soil around sewage leaks.
  • Hepatitis A: This highly contagious liver infection is caused by the Hepatitis A virus, which can be found in sewage water. It can lead to fatigue, sudden nausea, abdomen pain, especially on the right side beneath the lower ribs, and jaundice.

Remember, addressing sewer leaks immediately is vital to reduce these health risks and ensure your family’s safety. Stay safe, and don’t hesitate to reach out to your local health department or a professional plumber if you suspect a leak.

Call in the Pros at Full Speed Plumbing If You Notice a Sewer Leak

At Full Speed Plumbing, we cannot stress enough the importance of professional intervention when dealing with a sewer leak, even if you have a background in plumbing or construction. 

Such situations’ complexities and potential health hazards make DIY solutions risky and usually insufficient. Based in the Mount Vernon, Washington, community, our team of experts has the training and certification required to help you tackle this issue and provide high-quality customer service. 

Remember, a timely response can avert major repairs and health risks. Don’t wait until the problem escalates. If you notice a sewer leak, take immediate action. Schedule a service call with a Full Speed Plumbing technician – Mount Vernon’s number one choice for handling plumbing emergencies. 

Contact us today for prompt and reliable service. You can count on us to speed over and get your home back in full swing after an emergency sewer pipe leak!

Request Service